Quick Access Guide:
3. Disinfection
4. Lubrication
5. Sterilisation
6. Cool-down
Throughout the years we all came across several "hidden secrets" and ways to keep your handpieces operating smoothly - It's time to clean them up and demonstrate the proper way!
As handpieces have severely improved their performance through the past decades, somehow old ways of reprocessing, cleaning, and maintaining handpieces seem to still stick around and some things may never come out of fashion, the maintenance process should be checked from time to time.
At MK-dent we come in contact with all brands and products that have been in the market as we have been studying these products for years to constantly improve our own items. During these studies, it became visible that independently of the brands most of the same issues occur that can easily be prevented by taking care of a few easy steps.
1. Operation
During the operation, the sole focus of the practitioner should be on the patient to ensure the best possible results. Technically speaking it is essential to take a few safety and preparation measurements that ensure operational performance:
a) Drive air pressure
Handpieces are high performance products so it is absolutely necessary to ensure the proper set up to allow them to live up to their full potential. Prior to using the handpiece please ensure the correct drive air pressure is set on the dental chair as otherwise significant losses in power or even defects can occur.
Setting the air pressure wrong causes a loss in performance and can even damage the equipment. Click here to learn more about how to set up drive air and why it is so relevant.
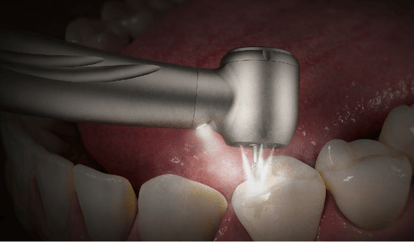
b) Correct Spray air and spray water pressure:
To ensure sufficient cooling of the tooth it is required to provide at least 50ml/min of spray water to the tooth to prevent the overheating of the pulp.
c) What burs should be used?
Please ensure that the diamond coating is still sufficient to ensure you have enough cutting power during the operation as ~ 80% of the diamonds are removed after 8 minutes of operation.
Also, the burs shafts should constantly be inspected to allow the handpiece spindle mechanism to properly grip the bur.
2. Cleaning
Cleaning your equipment is an essential but often overlooked process causing early fatigue in different components. Why is cleaning so important and isn't it enough to simply oil and sterilize it?
Either cleaning your instruments through a thermal disinfector or through the manual process ensures that (visible) debris is removed which is relevant medically and mechanically. Through the cleaning process, the bacterial count can be reduced up to 1/1000 in comparison to the initial count according to recent studies. So to prevent cross-contamination among patients and health staff. Kindly note that though it might not be required by law in your country (German laws require it according to the standards of the RKI) it is required according to our instructions for use.
Secondly cleaning your instruments will drastically reduce the repairs as debris within the handpieces is broadly removed from bearings, gear sets, and all other relevant components. This debris is a mixture of internal and external matter such as old lubrication and grease, small metal parts resulting from friction in the bearings and gears, as well as saliva and blood forming a polishing paste over time that harms bearings, gears, o-rings and technically everything that come in contact with it.
Manual Cleaning Process:
a) Required equipment:
- Running tap water
- Soft toothbrush
- Syringe with suitable lubrication adapter
- Interdental brush
- Alpro - WL-Clean cleaning solution
- Paper Cloth
b) Ensure the following steps are executed properly:
1. Surface cleaning
Rinse the handpiece under running tap water and flush it with the syringe and lubrication adapter. Ensure to brush off all deposits with the toothbrush
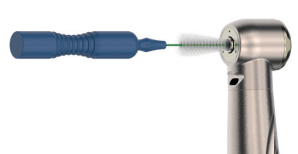
Use the interdental brush to clean out the spindle from debris.
To learn why cleaning the spindle is essential click here!
2. Internal cleaning
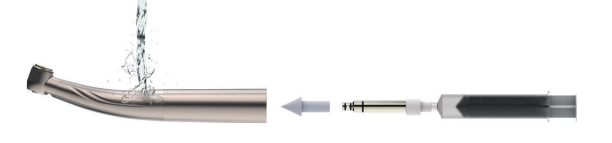
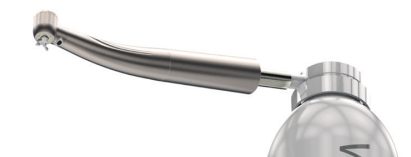
Take the lubrication adapter and screw it onto the Alpro WL-clean spray can. Ensure the adapter is properly seated and the o-ring is in good condition. Push the button on the spray can 2 times for 2 seconds each to properly flush the inside of the handpiece. Ensure to not over exceed the recommended exposure time
Want to know more about the proper usage of spray cans? Just click here
Ensure to cover the paper cloth with a reasonable amount of Alpro WL-Clean and wipe down the handpiece sufficiently
Automated Cleaning & Disinfection Process:
a) Required equipment:
- Thermal disinfection device (MK-dent used WD BHT INNOVA M3 for validation)
- Cleaning solution (MK-dent used Dr. Weigert Neodisher MediClean forte 0,5% for validation)
- Suitable adapter for handpiece connection (Available from thermal disinfector manufacturer)
- Ensure the water quality is equivalent to the EU-drinking water directive
b) Ensure the following steps are executed properly:
Cleaning & thermal disinfection
1 minute of cleaning with 0,5% Neodisher MediClean forte at 30°C or 86°F
6 minutes of cleaning with 0,5% Neodisher MediClean forte at 55°C or 131°F
1 minute of flushing with demineralized water
5 minutes of thermal disinfection with demineralized water at 90°C
Drying
Usually, the drying cycle is part of the drying cycle, but please ensure to verify if it this is the case. If you detect moisture after the entire process is finalized, it is necessary to dry the handpieces with compressed air.
High quality handpieces are made and coated from corrosion-resistant materials so they will not corrode under normal circumstance. If the drying is not properly executed, the moisture left on the handpiece will attract several aggressive substances, that will settle on the material, which may cause a corrosive effect.